My Account

Cart Check Out
International Point of Sale International Point of Sale
[ Home ] [ Software ] [ Hardware ] [ Complete Systems ] [ About Us ] [ Download ] [ Free Quote ]
Products
>> Barcode Scanners
>> Card Swipers
>> Cash Drawers
>> Cash Registers
>> Check Readers
>> Complete POS
>> Keyboards
>> Label Printers
>> Labels
>> Pole Displays
>> Portable Terminals
>> Posiflex Jiva
>> Price Checkers
>> Printheads
>> Receipt Printers
>> RFID Printers
>> Ribbons
>> Signature Pads
>> Touchscreens
News
  Check out the full article library
 

5.31.2006


Restaurant Pro Express is used by employees
POS Solution for Restaurants

Read more articles.....


12.23.2004


Liquor POS system
Liquor Store Point of Sale Solution

Read more articles.....


3.20.2005


C-Store POS system
The Best Convenience Store POS

Read more articles.....


04.01.2004


Labels, Ribbons, and Printheads available for printers
Labels, Ribbons, and Printheads

Read more articles.....


02.13.2004


All makes of barcoder readers available
Barcode Scanners 101

Read more articles.....


10.15.2004


Symbol SPT1550 pocket data register and terminal
Choosing a portable Point of Sale System

Read more articles.....


Library
 

Add a Vendor

Adding a Vendor lets you keep track of who you're getting you are purchasing items in your inventory from. This is an often overlooked convience of a POS software, it lets you keep track of many facets of your stores operation.

Photo of Vendoir Maintenance screen that lets you add a vendor in Cash Register Express Adding a Vendor into your database is easy.

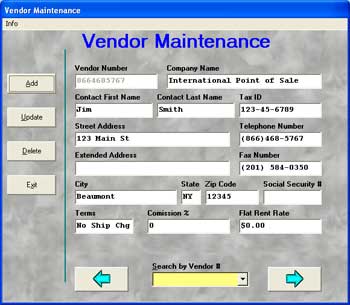
1. To add a vendor, click on the Options menu, then click on Adiminstrative at the bottom left. Select Vendor Maintenance.

2. Creating a Vendor:
  • Click on the Add button.

  • Type in a vendor number in the field marked Vendor Number. Many people use a telephone number as a vendor number. NOTE: Do not use an asterisk, *, in the vendor number.

  • Use <TAB> or the mouse to move the cursor to the different fields. Once you have entered all the vendor's information click on the Save button. If you want quit without creating a vendor clock on the Cancel button.
3. To update or delete a vendor.

  • Select the desired vendor. Scroll through desired vendor by using the right arrow or the drop down list in the middle of the arrows.

  • Change the desired information on the vendor and then click Update. Click on Exit to quit without saving any changes.

  • To delete a vendor that is selected, just click on the Delete button.
Now that you've added a vendor go to the next step of the tutorial: Add an Inventory Item

Step 4: Add a Department
Step 5: Add a Vendor
Step 6: Add an Inventory Item
Step 7: Add a Customer
Step 8: Process a Cash Transaction
Return to main tutorial screen


Return to the POS library.


Contact Us for the Best Deals Anywhere: 1-866-468-5767


Home | Articles | POS Software | POS Hardware | Complete Systems | About Us | Download

POS Software | Receipt Printer | Barcode Scanner | Pole Display | Inventory Management
Credit Card Swiper | Cash Drawer | Label Printing | Portable Terminal
Site Map 2 3 full
sales@internationalpointofsale.com


© 2006 International Point of Sale 1-866-468-5767 or 201-928-0222